

 Modern design
 Perfect fit
 High durability
 Free shipping within 24 hours
 Individual project
 Dedicated caregiver


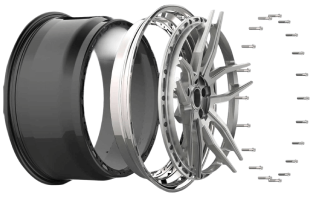
Rim and tire optimization
Optimizing the tire to the rim - as a standard procedure during balancing
We have two tire replacement seasons a year, one for summer and one for winter. These days, this is a very busy time for every tire shop, and appointments must be scheduled several days in advance. Therefore, during this time, services may not be performed with the proper attention and precision from the service technician, due to work overload, lack of time, and the desire to maximize profits in this highly seasonal profession. Optimizing the tire to the rim should be a standard procedure when balancing a complete wheel. Optimization, of course, requires additional time, which is not available when a line of vehicles is waiting in front of the workshop for their turn to be changed.
Most of us have probably encountered, if not in our own car, then in a friend's or neighbor's car, a large number of weights stuck to the rims. In a large percentage, this is due to poor service and a lack of wheel optimization. In a smaller percentage, but still important to consider, it can be caused by manufacturing defects, damage to the rim, or tire. Today, we'll describe what tire-to-rim optimization involves and how to perform it.
First of all - check the visual condition of the rims and tires
Rims, like tires, are underweight, and there's no situation where they don't require balancing. That's why wheel balancers exist. Before mounting tires, the employee should visually inspect the rims and tires for any mechanical damage, such as dents, dents, or, in the case of tires, what are commonly known as "bumps."


Photo: dented rim edge.
What does proper rim mounting on a wheel balancer look like?
When it comes to rims, it's always worth checking the mounting surface where the rim meets the vehicle's hub. Both components should be clean and free of rust deposits or, for example, excess aluminum in the case of alloy wheels. The surfaces should fit perfectly together.

Photo: graphic from a surface with a chip.
The method of mounting the aluminum wheel on the wheel balancer is crucial. On the inner side, where the rim meets the hub, it should be inserted onto a conical holding element. On the outer side, where the center cap with the car brand or wheel manufacturer's logo is inserted, it should be inserted using a FLAT rubber element. This is mostly due to the machining method used on aluminum wheels. The majority of aluminum wheels are manufactured using a low-pressure die-casting method, which requires additional machining with CNC machines. The inner side of the wheel, on the hub side, is milled, so it can be placed on a CONE; the outer side, on the center cap, does not need to be milled, which can cause the wheel to mount crookedly on the wheel balancer when using a CONE. Therefore, the rim should be pressed down with a flat rubber element.
The ideal solution is to center the rim on the mounting holes in the rims using a pressure plate, but unfortunately this is very, very rarely used.


Photo: method of installation on the balancer.
How to optimize the tire for the rim?

What does the term "TIRE TO RIM OPTIMIZATION" mean? It's nothing complicated; it simply involves finding the optimal tire position on the rim. As mentioned earlier, both the rim and the tire are underweight and not ideal. If these underweights in the tire and rim overlap, a significant weight loss occurs, which must be eliminated with weights. OPTIMIZATION involves rotating the tire relative to the rim. If the tire fitter doesn't use the balancing program for this purpose, they first rotate the tire relative to the rim by 180 degrees, then verify the deviation. They can repeat this process, this time by 45 degrees. Using the balancer, they will indicate the ideal relative position! In summary, you need to deflate, deflate, rotate, inflate, and balance the wheel several times. This is labor-intensive and time-consuming, and for this reason, this practice is rarely used during tire change seasons. It is more profitable for tire repairers to attach additional weights to the rim than to rotate the tire and occupy one of the work stations.
Photo: rim on the balancer.
Below we present an example of an optimization manual provided by the manufacturer of one of the leading Polish brands of balancing machines, UNI-TROL.
Tire-to-rim optimization - first stage
The first step is to run an empty rim (without a tire) on the wheel balancer. This will allow us to determine its technical condition. We can see with the naked eye whether the rim is spinning straight. We can also see how many grams are needed to balance the rim itself. We can determine whether a significant underweight is due to the rim or the tire. Remember that using tire pressure sensors will also result in a greater underweight. Don't worry, the optimization process is still ahead of us!
Remember that deviations are more significant than the weight itself! Reduce the weight with weights; larger deviations require replacement or repair of the rim. For aluminum rims, vertical deviations should not exceed 0.5mm.
Photo: rim on the balancer.
Video: measuring deviations.
Tire-to-rim optimization - second stage
The second stage, by restarting the measurement cycle, allows the machine to calculate the size and location of the tire and rim imbalances and indicate their optimal position relative to each other.
The balancer's software will indicate how to rotate the rim relative to the tire to compensate for the imbalance as much as possible! At this point, with larger sizes, the tire must be removed from the rim beads to allow for rotation. This is why most tire repair shops don't do this; it's time-consuming, and we won't double-charge the customer. The tire repair shop will say, "You bought poor-quality products, that's all."
In our case, profit = fewer grams needed for wheel balancing, that's as much as 45 grams!


Photo: gain in grams.
Summary.
Continental recommends rebalancing the wheel when changing a tire. This will prevent vibration and premature wear due to imbalance between the rotating rim and tire.
As part of routine vehicle maintenance, drivers should have their wheels balanced after 5,000–10,000 km or 1–2 years (whichever comes first).
Even the largest facility with the most modern and expensive equipment cannot replace an experienced and reliable specialist with experience. We can check a few things ourselves before taking the rims and tires for vulcanization. We can also observe the vulcanizer at work and see how they approached the tire installation service.
Author: Michał Okrągły